Angular Animations Tutorial: Query and Stagger
I work in Angular every day and I build things that need to be animated or transitioned when interacted with. And, because of this, I’m thankful for the Animations module. There are so many useful features available that make life much easier. We’re going to look at two of these features in this post. First, we’re going to use the query() function to find and animate several items at once. Then, we’ll use the stagger() function to create a delay between the animations running on each of these items. Alright, let’s get to it!
Before we get too far along, it’s important to note here that I’ve already created several posts focused on the animation framework. They cover the basics of setting up and using Angular animations, creating state-based and :enter/:leave animations, and using the keyframes() function to create more complex animation sequences. So, if any of those concepts are unfamiliar to you, you’ll probably want to check those posts out first so that you’re not lost in this post.
Angular CDK Overlay Tutorials:
Ok, enough of that, onto the example for this post.
The Demo Application
Here we have this application listing out some NBA players. At first, we only see Lebron James, but when we click the add button at the bottom, the list is updated to show the rest of the players from our collection. And, when we hit the remove button, all players but Lebron are removed.
This is cool but the way these items are added and removed is a little lame. It would be better to transition them in and out like this wouldn’t it?

Well, this is actually all possible with the Angular Animations module.
Using the query() Function to Animate Multiple Items as They Enter and Leave
We’re going to start by using the query() function to query for all items entering and leaving the DOM to transition them as they do so. The query() function expects a selector parameter as a string, then an array of AnimationMetadata, and optionally an options object of AnimationQueryOptions.
query(selector: string,
      animation: AnimationMetadata | AnimationMetadata[],
      options: AnimationQueryOptions)
Ok, let’s look at some code. For our list of players, we start with an array of the first player in the list data, Lebron.
main.ts
protected players = [players[0]];
Then, when we hit the add button, we call this addplayers() function which will add a bunch more players to the array, from our players data.
protected addPlayers() {
    const allPlayers = players.slice(1);
    this.players = [...this.players, ...allPlayers];
}
And when we hit the remove button we call this removePlayers() function to remove all but the first player from the list.
protected removePlayers() {
    this.players = [this.players[0]];
}
Then, in the template, we use a @for loop to iterate over the array of player objects to loop out a player component, for each player which, displays the data.
app.component.html
<section cdkScrollable>
    <div>
        @for (player of players; track player.name) {
            <app-player [player]="player"></app-player>
        } @empty {
            <p>Sorry, we couldn't find any players with the name you entered</p>
        }
    </div>
</section>
Now, if we recall from the post I created on :enter and :leave animations, these items are being added to and removed from the DOM so we can transition these using the :enter and :leave aliases.
Setting up the Animation
We start by adding our animations array within our component. Then we add an animation trigger with the trigger() method, let’s name it “animation”. Within the array for this trigger, we’ll add a transition using the transition() method.
We’re going to bind this animation to our players array, so when that array data changes, we trigger our animation. This means that for our state, we will need to animate from any state to any state, which we can do with, an asterisk, arrows both ways, and then another asterisk.
main.ts
import { transition, trigger } from '@angular/animations';

@Component({
    selector: 'app-root',
    animations: [
        trigger('animation', [
            transition('* <=> *', [
            ]
        ])
    ]
})
Alright, so all of that animation configuration, up to this point, should be familiar from my previous posts on animations. But now we’re going to do something you may not have seen before. We’re going to use the query() function.
Using the query() Function for the Enter Animation
This function will query within the element the trigger is placed on, for items matching the selector or selectors provided to it. In our case we are going to add it to the element that contains our @for loop. The reason for this is so that we can query for all items being added to the DOM, nested within this container, using the :enter alias.
import { ..., query } from '@angular/animations';

@Component({
    selector: 'app-root',
    animations: [
        trigger('animation', [
            transition('* <=> *', [
                query(':enter')
            ]
        ])
    ]
})
Ok, after providing the selector, we need to provide our animations as an array. First, let’s add the style that we’ll start from with the style() function. Let’s start from an opacity of zero, and transform from a scale of point seven. So, the items will start out scaled down and invisible.
import { ..., style } from '@angular/animations';

@Component({
    selector: 'app-root',
    animations: [
        trigger('animation', [
            transition('* <=> *', [
                query(':enter', [
                    style({opacity: 0, transform: 'scale(0.7)'})
                ])
            ]
        ])
    ]
})
Then we’ll create our transition using the animate() method. We’ll animate over five hundred milliseconds, and we’ll use an ease-in timing function. Now let’s add the style we’ll transition to with another style() function. We’ll end at an opacity of one so that it’s fully visible, and we’ll transform to a scale of one so that it’s full size.
import { ..., animate } from '@angular/animations';

@Component({
    selector: 'app-root',
    animations: [
        trigger('animation', [
            transition('* <=> *', [
                query(':enter', [
                    style({opacity: 0, transform: 'scale(0.7)'}),
                    animate('500ms ease-in', style({opacity: 1, transform: 'scale(1)'}))
                ])
            ]
        ])
    ]
})
Ok, now let’s go into the template, and bind the animation trigger onto our div, and we’ll use the players field to trigger the animation.
app.component.html
<section cdkScrollable>
    <div [@animation]="players">
        @for (player of players; track player.name) {
            ...
        }
    </div>
</section>
Ok, let’s save and see how this looks.

When we hit the add button now, we can see all the items transition in nicely. That’s cool, so we know this animation is properly querying for all items entering and properly transitioning them.
Using the query() Function for the Leave Animation
Ok, now let’s get them animating out on :leave. Let’s just copy our enter animation, and then switch query for items leaving with the :leave alias. Then we just need to flip the styles that we’re animating between. So, we’ll start with an opacity of one, and a scale of one. Then, we’ll animate to an opacity of zero, and a scale of point seven.
main.ts
@Component({
    selector: 'app-root',
    animations: [
        trigger('animation', [
            transition('* <=> *', [
                ...,
                query(':leave', [
                    style({opacity: 1, transform: 'scale(1)'}),
                    animate('500ms ease-in', style({opacity: 0, transform: 'scale(0.7)'}))
                ])
            ]
        ])
    ]
})
Ok, let’s save and try this now.
Woah, it looks like the :enter animation is no longer working. And the :leave animation is doing some weird stuff too. But, there’s a reason for this.
Making the Animation query() Optional
When using the query() function, sometimes there may be no items matching the items you’re querying for. And this is the case for our :leave animation. On initialization, there’s only one thing happening, one item is entering because we have only one list item. There are no items leaving, so we get an error which we can se if we expand the console.
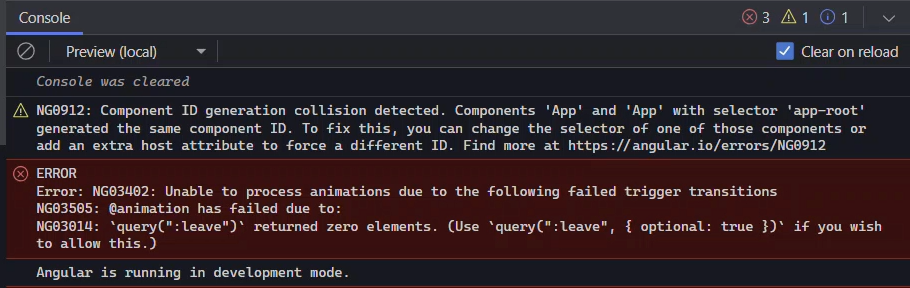
It tells us exactly what’s happening and what we need to do to fix it. We just need to add this options object, with optional set to true, to our queries.
@Component({
    selector: 'app-root',
    animations: [
        trigger('animation', [
            transition('* <=> *', [
                query(':enter', [
                    ...
                ], { optional: true }),
                query(':leave', [
                    ...
                ], { optional: true })
            ]
        ])
    ]
})
Ok, now let’s save and try again.
Nice, now our :enter animation is working correctly again. And, this time, our :leave animation is working too. But I really don’t like how all of these items animate in at the same time. I would rather stagger them in and out, and that’s exactly what we’re going to do next.
Adding a Stagger Effect When Many Items are Aminating at Once
For this stagger effect, Angular has us covered with the stagger() function. This function expects the animation timings as a string or number, exactly like we’re used with the animate() function. And for its second parameter, it expects an array of AnimationMetadata, also like we’re used to with the animate() function.
stagger(timings: string | number,
        animation: AnimationMetadata | AnimationMetadata[])
Ok, so let’s add the stagger function to our enter animation.
Staggering Items as They Enter
Here, we’re going to wrap the animation() function, so we’ll add the stagger() function. And the first parameter is the timing to delay the animation, we’ll go with one hundred milliseconds. Then, we have an array, and this will wrap the animation.
import { ..., stagger } from '@angular/animations';

@Component({
    selector: 'app-root',
    animations: [
        trigger('animation', [
            transition('* <=> *', [
                query(':enter', [
                    style({opacity: 0, transform: 'scale(0.7)'}),
                    stagger(100, [
                        animate('500ms ease-in', style({opacity: 1, transform: 'scale(1)'}))
                    ])
                ], { optional: true }),
                ...
            ]
        ])
    ]
})
Ok, let’s save and see how it works now.
Cool, that’s a much nicer effect. I like that a lot better. Ok, now let’s stagger them as they leave too.
Staggering Items as They Leave
We just need to add the stagger() function around our :leave animation this time. And, we’ll keep the one hundred millisecond timing to be consistent.
@Component({
    selector: 'app-root',
    animations: [
        trigger('animation', [
            transition('* <=> *', [
                ...,
                query(':leave', [
                    style({opacity: 1, transform: 'scale(1)'}),
                    stagger(100, [
                        animate('500ms ease-in', style({opacity: 0, transform: 'scale(0.7)'}))
                    ])
                ], { optional: true })
            ]
        ])
    ]
})
Ok, let’s save and try this now.

Ok, that’s cool. It’s staggering now but I’d rather it stagger them out the other way so that the last item to leave is the one at the top instead it being the first item to leave like it is now.
Reversing the Stagger Order
Well, guess what, this is pretty easy to do. We just need to make the timing a negative number.
stagger(-100, [
    ...
])
Now, let’s save and try one more time.

Nice, now that seems like the right way to animate those.
Conclusion
Ok so now you know how to query for one-to-many items to animate, and you know how to stagger them too. So, hopefully you found this helpful.
Now remember, there’s still a lot to the animation framework, so I’ll go ahead and stop here for now, but I will be creating several more posts on Angular animations very soon.
Want to See It in Action?
Check out the demo code and examples of these techniques in the in the Stackblitz example below. If you have any questions or thoughts, don’t hesitate to leave a comment.
Found any of this Stuff Helpful?
If you found any this helpful and want to show some love, you can always buy me a coffee!